ZIO dependency injection
One of software development challenges is structuring code. In this article I would like to focus on the basics of dependency injection (DI), which separates object creation and usage. It allows substituting implementations, e.g. changing configuration in tests or during refactoring. There are many ways to do it in Scala. DI can be divided into two groups
- pure Scala solution like constructor based manual DI, cake pattern or monad reader
- external libraries such as guice, MacWire or article subject ZIO and ZLayers
Then let’s talk about the basic concepts of ZLayer and DI
Constructor base DI
To be able to understand DI and ZLayers, let’s talk a little bit about manual DI, the most basic way of doing DI. It doesn’t mean it is not useful. It has some advantages:
- does not require external libraries/frameworks
- easy to understand for newcomers
- much easier code navigation
- clear starting point
Example:
  final case class Config(delayBetweenFailLoginAttempts: FiniteDuration)
  final case class User(username: String, password: String, apiKey: String)

  trait AuthService {
    def auth(username: String, password: String): String
  }

  class AuthServiceLive(config: Config) extends AuthService {
    override def auth(username: String, password: String): String = {
      s"api key for $username"
    }
  }
  trait UserService {
    def login(username: String, password: String): User
  }
  class UserServiceLive(authService: AuthService) extends UserService {
    override def login(username: String, password: String): User = {
      val apiKey = authService.auth(username, password)

      User(username, password, apiKey)
    }
  }

  val config: Config = Config(1.second)
  val authService: AuthService = new AuthServiceLive(config)
  val userService: UserService = new UserServiceLive(authService)
When we decide to use ZIO as a library in our application, the code transforms to:
import zio.{Scope, ZIO, ZIOAppArgs, ZIOAppDefault}

import scala.concurrent.duration.{DurationInt, FiniteDuration}

object ZIOApplication extends ZIOAppDefault {
  final case class Config(delayBetweenFailLoginAttempts: FiniteDuration)

  final case class User(username: String, password: String, apiKey: String)

  trait AuthService {
    def auth(username: String, password: String): ZIO[Any, Nothing, String]
  }

  class AuthServiceLive(config: Config) extends AuthService {
    override def auth(
        username: String,
        password: String
    ): ZIO[Any, Nothing, String] = {
      ZIO.succeed(s"api key for $username")
    }
  }

  trait UserService {
    def login(username: String, password: String): ZIO[Any, Nothing, User]
  }

  class UserServiceLive(authService: AuthService) extends UserService {
    override def login(
        username: String,
        password: String
    ): ZIO[Any, Nothing, User] = {
      authService.auth(username, password).map { apiKey =>
        User(username, password, apiKey)
      }
    }
  }

  val config: Config           = Config(1.second)
  val authService: AuthService = new AuthServiceLive(config)
  val userService: UserService = new UserServiceLive(authService)

  override def run: ZIO[Any with ZIOAppArgs with Scope, Any, Any] = {
    for {
      user <- userService.login("username", "password")
      _    <- ZIO.logInfo(s"$user")
    } yield ()
  }
}
ZIO and ZLayers
Despite manual DI being easy, it tends to be hard to maintain, especially as the application becomes more sophisticated with many dependencies. Moreover, it’s usually good to follow the philosophy of the library/framework to make the software maintainable.
Now, let’s rewrite manual DI to ZIO ZLayers.
import zio.{Scope, ZIO, ZIOAppArgs, ZIOAppDefault, ZLayer}

import scala.concurrent.duration.{DurationInt, FiniteDuration}

object ZIOApplication extends ZIOAppDefault {
  final case class Config(delayBetweenFailLoginAttempts: FiniteDuration)

  val liveConfig: ZLayer[Any, Nothing, Config] =
    ZLayer.succeed(Config(1.second))

  final case class User(username: String, password: String, apiKey: String)

  trait AuthService {
    def auth(username: String, password: String): ZIO[Any, Nothing, String]
  }

  class AuthServiceLive(config: Config) extends AuthService {
    override def auth(
        username: String,
        password: String
    ): ZIO[Any, Nothing, String] = {
      ZIO.succeed(s"api key for $username")
    }
  }

  def createAuthService(config: Config): AuthService = {
    new AuthServiceLive(config)
  }
  val liveAuthService: ZLayer[Config, Nothing, AuthService] =
    ZLayer.fromFunction(createAuthService _)

  trait UserService {
    def login(username: String, password: String): ZIO[Any, Nothing, User]
  }

  class UserServiceLive(authService: AuthService) extends UserService {
    override def login(
        username: String,
        password: String
    ): ZIO[Any, Nothing, User] = {
      authService.auth(username, password).map { apiKey =>
        User(username, password, apiKey)
      }
    }
  }
  def createUserService(authService: AuthService): UserService = {
    new UserServiceLive(authService)
  }

  val liveUserService: ZLayer[AuthService, Nothing, UserService] =
    ZLayer.fromFunction(createUserService _)

  override def run: ZIO[Any with ZIOAppArgs with Scope, Any, Any] = {
    val program = for {
      userService <- ZIO.service[UserService]
      user        <- userService.login("username", "password")
      _           <- ZIO.logInfo(s"$user")
    } yield ()

    program.provide(
      liveConfig,
      liveAuthService,
      liveUserService
    )
  }
}
As we can see, there’s no longer a need to manually create instances. Instead, we describe the requirements of a service using the ZLayer type, which takes three types: RIn for requirements, E for errors that can be thrown on object creation, and ROut for the type that ZLayer will return on success. It’s an identical concept to the ZIO effect type. It’s not by accident; it’s a core ZIO concept that describes computation using types.
But how does it work? From the user’s perspective, we define ZLayers for each service and use the provide method, which takes all ZLayers and constructs a dependency graph, creating a single instance of each class. Importantly, this happens during compilation. Java DI frameworks such as Guice use reflection at runtime. If we miss any dependency and don’t provide it, the compilation fails with information about what is missing.
For example:
program.provide(
      liveConfig,
    //   liveAuthService,
      liveUserService
    )
The compilation fails with an error
──── ZLAYER ERROR ────────────────────────────────────────────────────

 Please provide a layer for the following type:

   1. com.sezerp.ZIOApplication.UserService

──────────────────────────────────────────────────────────────────────


    program.provide(
Additionally, ZIO provides some tools that can be helpful during debugging ZLayers. One of the disadvantages is that ZLayers and layer construction, and then the whole DI, have been written as Scala macros. That means it is not easy to understand the internal code. Despite that, we do not need to worry too much because since ZIO 1 the authors have drawn conclusions and made it easier to use. One of the tools provided with ZIO is a dependency graph drawer. Let’s see it in action
Let’s add ZLayer.Debug.tree and see the output
program.provide(
      liveConfig,
      liveAuthService,
      liveUserService,
      ZLayer.Debug.tree
    )
Compiler output:
[warn] ◉ liveUserService
[warn] ╰─◑ liveAuthService
[warn]   ╰─◑ liveConfig
[warn]
[warn]     program.provide(
The output prints a dependency tree. Another option is to construct and print a dependency graph and additionally construct a mermaid graph. Mermaid is a JavaScript tool for creating charts.
program.provide(
      liveConfig,
      liveAuthService,
      liveUserService,
      ZLayer.Debug.mermaid
    )
Compile output:
[warn] ◉ liveUserService
[warn] ╰─◑ liveAuthService
[warn]   ╰─◑ liveConfig
[warn]
[warn] Mermaid Live Editor Link
[warn] https://mermaid-js.github.io/mermaid-live-editor/edit/#eyJjb2RlIjoiZ3JhcGggQlRcbkwwKFwibGl2ZUNvbmZpZ1wiKVxuTDAgLS0+IEwxKFwibGl2ZUF1dGhTZXJ2aWNlXCIpXG5MMSAtLT4gTDIoXCJsaXZlVXNlclNlcnZpY2VcIikiLCJtZXJtYWlkIjogIntcInRoZW1lXCI6IFwiZGVmYXVsdFwifSJ9
The output provides a link to visualize your dependencies using Mermaid.
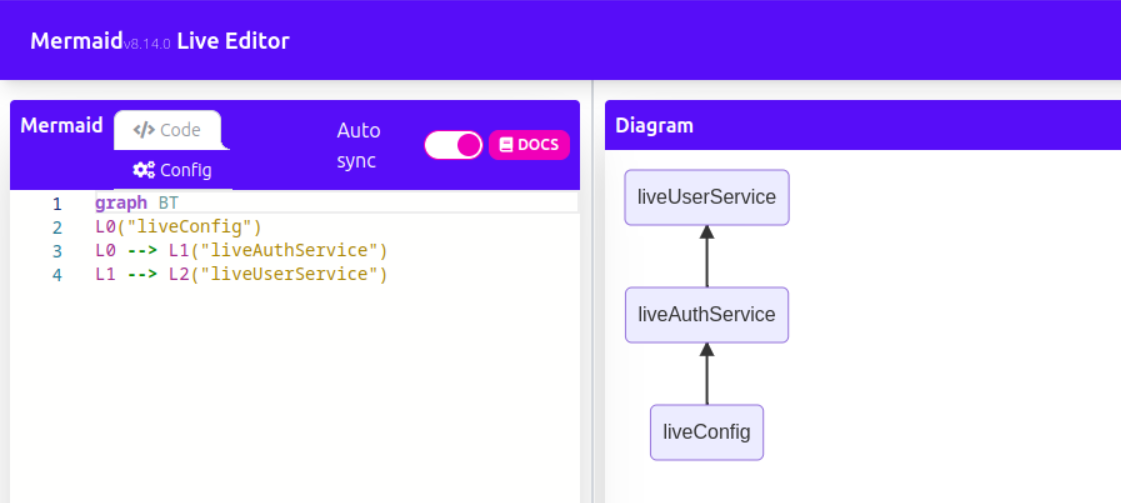
As we can see, the ZLayer.Debug.mermaid method additionally constructs and shows a graph and provides a link to visualize our dependencies.
Summary
DI is a widely used pattern in all programming languages. While it requires more effort from developers, it returns benefits over time. ZIO provides its own DI, ZLayer, which is quite good and, in my opinion, recommended for use along with ZIO, especially with ZIO 2. Unfortunately, ZIO 1 is much more complicated and problematic and is not described here.